
Introduction.
Give your eyes five extra minutes in the morning and they’ll do more for your whole face than almost anything else in your routine. This guide is built for two kinds of readers: the person who owns one eyeshadow palette and isn’t sure where to start with it, and the person who’s ready to finally understand what a “cut crease” actually is and how to do one.
You’ll walk away knowing how to build a full look from bare lids, how to adjust technique for your specific eye shape, and how to spot the small habits that quietly separate amateur eye makeup from polished eye makeup. It’s a detailed guide on purpose. Eye makeup is one of the few beauty skills where understanding why a step works matters more than just memorizing the order to do it in.
Want me to swap in a different opening hook entirely (a stat-led opener, a shorter punchier version, a more conversational one), or just refine this further?
GrandeLASH-MD Lash Enhancing Serum Review
Why Eye Makeup Deserves Its Own Learning Curve
Eye makeup is arguably the most technical part of a beauty routine. Foundation and blush reward a light hand and good blending. Eyes reward precision, layering, and an understanding of how color and light interact on a small, curved, constantly moving surface. Add in the fact that eyelids differ enormously from person to person, in shape, in texture, in oil production, in how much skin is visible when eyes are open, and it’s easy to see why a technique that looks effortless on one person can feel impossible to replicate on another.
That complexity is also why so many people give up on eyeshadow after a few frustrating attempts. The good news: most “bad at eye makeup” problems come down to about five fixable habits, not a lack of natural talent. Once you understand lid anatomy, product order, and blending basics, the rest is repetition. Nobody applies a flawless smoky eye on the first try. Professional makeup artists build muscle memory the same way anyone builds a skill: by doing it badly a few dozen times first.
According to a 2023 Circana report on U.S. beauty spending, eye makeup remains one of the fastest-growing color cosmetics categories, with mascara, eyeliner, and eyeshadow all posting year-over-year growth as consumers returned to in-person events and experimented more with color after years of muted, mask-era routines. That growth reflects a real shift: eye makeup isn’t just for special occasions anymore, it’s become a daily creative outlet. Social platforms have also changed how people learn. A decade ago, most people learned eye makeup from a magazine tutorial or a friend. Today, most beginners are self-taught through video, which means access to techniques has exploded, but so has the temptation to skip fundamentals and jump straight to advanced looks that assume a foundation you may not have yet.
This guide starts at that foundation.
Eye Makeup Education: Anatomy, Terms, and the Basics You Need First
Before touching a brush, it helps to know the map you’re working with. Every eye makeup tutorial you’ll ever watch assumes you already know these terms, and not knowing them is one of the biggest silent barriers for beginners.
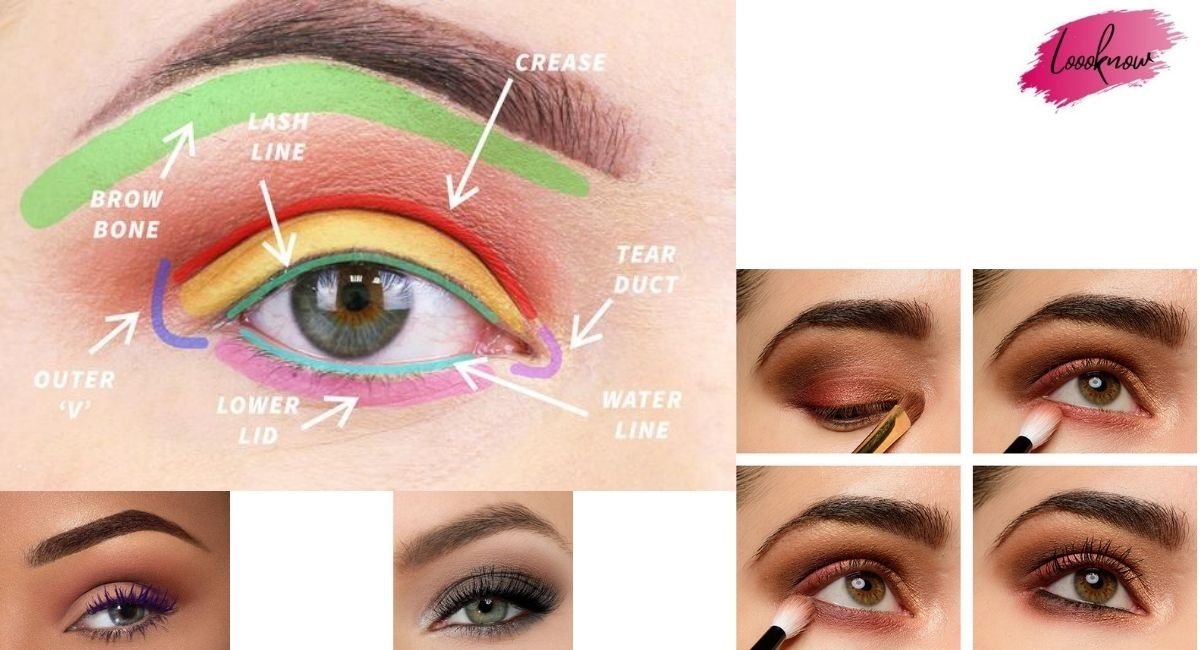
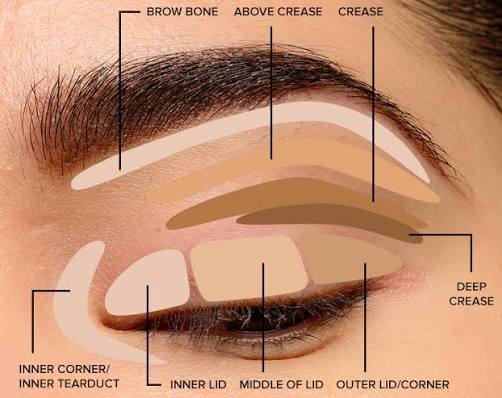
The lid is the area from your lash line to your crease, the primary space for shadow color. This is usually where the lightest or most pigmented shade goes, depending on the look.
The crease is the fold where your eyelid meets your brow bone, used to add depth and dimension. On some eye shapes this fold is highly visible; on others, it’s partially or fully hidden, which changes how you should approach shading it.
The brow bone is the area just under your eyebrow, typically highlighted to lift the whole eye. A small amount of light, often shimmery shadow here can make the whole eye look brighter and more awake.
The waterline is the inner rim of your lower lash line, often lined for definition or left bare to keep eyes looking open. A white or nude waterline pencil is a classic trick for making eyes appear larger, while a black waterline pencil intensifies and dramatizes the eye.
The outer corner (or outer V) is where liner and darker shadow usually meet to create a lifted, elongated effect. This small triangular area carries a disproportionate amount of visual weight in a finished eye look.
The inner corner is the small triangular space closest to the nose. Highlighting this area with a touch of light or shimmery shadow is one of the fastest ways to make tired eyes look brighter.
Common Terms You’ll See on Product Packaging and Tutorials
- Matte: flat, non-shimmery finish, best for blending and crease definition. Mattes are the workhorse finish; they’re forgiving, easy to blend, and rarely emphasize texture or fine lines.
- Shimmer: reflective finish that catches light, great for lids and inner corners. Shimmer shadows tend to be more pigmented and can be trickier to blend seamlessly, so they’re usually applied after mattes are in place.
- Metallic/foil: intensely reflective, almost wet-looking finish, often applied with a damp brush or fingertip for maximum payoff.
- Duochrome: shifts between two colors depending on the angle and light, giving a color-shifting effect that photographs and moves beautifully.
- Satin: a middle ground between matte and shimmer, with a soft sheen but less obvious sparkle.
- Cut crease: a technique where a sharp line of concealer or light shadow separates the lid color from the crease color, creating a dramatic, sculpted effect. This is one of the more advanced techniques covered later in this guide.
- Halo eye: light shadow concentrated in the center of the lid with darker shadow blended around the outer corners and crease, creating a spotlight effect in the middle of the eye.
- Smoked-out liner: eyeliner that has been intentionally softened and blended into the lash line rather than left as a crisp line, giving a moodier, less defined edge.
Understanding this vocabulary matters because tutorials, product descriptions, and even eyeshadow palette naming all assume you know these terms. Once they click, following along becomes much easier, and shopping for products becomes far less overwhelming, because you can identify exactly what finish and function you’re looking for instead of guessing from a swatch photo.
The Products You Actually Need
You don’t need forty products to do great eye makeup. You need the right handful, used well. It’s worth resisting the urge to buy an enormous palette right away; a smaller, well-curated kit will teach you more, faster, than a sixty-pan palette where most shades never get touched.
Eyeshadow Primer
A primer creates a smooth, slightly tacky base so shadow adheres evenly, lasts longer, and doesn’t crease into your lid fold by midday. Without primer, cream and powder shadows are far more likely to fade or settle into fine lines, especially on oilier lids. A pea-sized amount pressed, not rubbed, across the lid is enough. Rubbing tends to push the product into the fine texture of the lid rather than creating an even film across the surface, which is part of why a “dabbing” motion works better than a swipe.
If you have very oily eyelids, look specifically for a primer marketed as “long-wear” or “oil-control,” since standard primers may not hold up through a full workday. If your lids are on the drier side, a lightweight, slightly hydrating primer will prevent shadow from looking patchy or emphasizing texture.
Eyeshadow Palette
Look for a palette with a mix of finishes: at least one matte transition shade, a shade close to your skin tone used to soften the crease, one deeper matte for definition, and one or two shimmers for the lid. A well-edited nine-to-twelve pan palette will outlast and outperform a novelty sixty-pan palette full of shades you’ll never reach for. When you’re starting out, a neutral palette in warm browns and taupes will get more genuine use than a palette built entirely around bold, single-use colors, simply because neutral tones work with nearly every outfit and occasion.
Brushes
Three brushes cover 90% of eyeshadow application:
- A fluffy blending brush for softening the crease. This should be soft, slightly domed, and large enough to cover the crease area in a few strokes.
- A flat shader brush for packing color onto the lid. This brush is denser and flatter, built to deposit pigment rather than blend it.
- A small pencil brush for precision work in the outer corner and lower lash line. This is your detail tool, useful for tight spaces a bigger brush can’t reach cleanly.
A fourth, optional brush, a small angled brush, is useful once you start doing more precise outer-corner work or want to apply shadow as eyeliner for a softer definition line.
Eyeliner
Pencil liners are the most forgiving for beginners because they can be smudged and softened with a brush or cotton swab if the line isn’t perfect. Gel and liquid liners give sharper, more graphic lines but require a steadier hand and more practice to apply symmetrically on both eyes. A good beginner approach is to start with a pencil liner, get comfortable with the shape and angle you like, and only move to liquid liner once that shape feels natural to draw.
Mascara
Mascara is the single product most likely to make eye makeup look “finished.” A good formula defines lashes without clumping, and a curved wand generally does a better job hugging the natural curve of American lash lines than a straight wand. Wiggling the wand at the base of the lashes before sweeping upward helps distribute product evenly and builds volume at the root, which is where most lash lines look sparse first.
Setting Spray or Powder
A light dusting of translucent powder under the eyes before shadow application, sometimes called the “baking” or “under-eye shield” trick, catches any fallout, which you then dust away with a clean brush once you’re done. This single step saves an enormous amount of after-the-fact cleanup, especially when working with shimmer or glitter shadows that tend to scatter fine particles as they’re applied.
Revlon ColorStay Pencil Waterproof Eyeliner Review
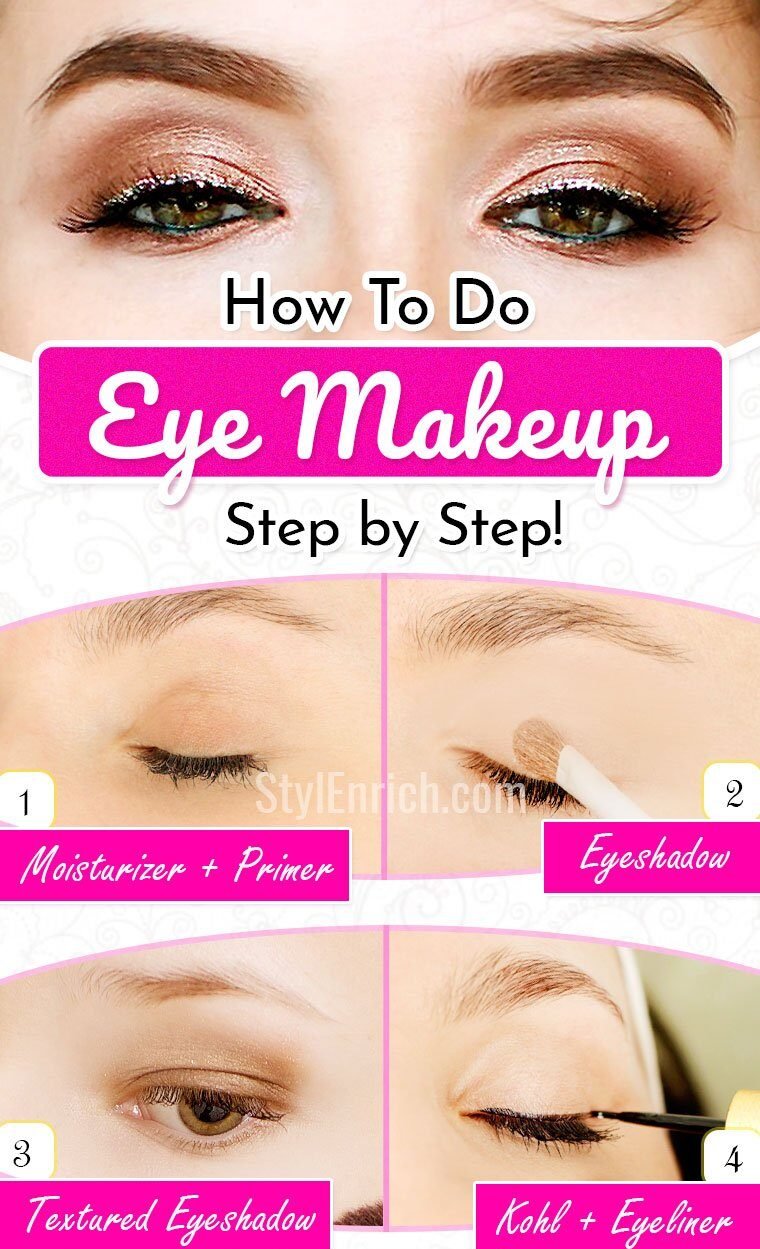
Step-by-Step Tutorial: A Foundational Everyday Eye Look
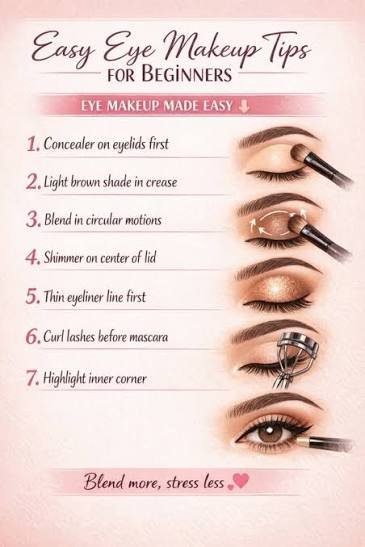
This technique works as a base for almost any eye look, from natural daytime makeup to a full smoky eye. Master this sequence first, then modify it. Read through all ten steps once before starting, so you understand where the look is heading before you begin blending.
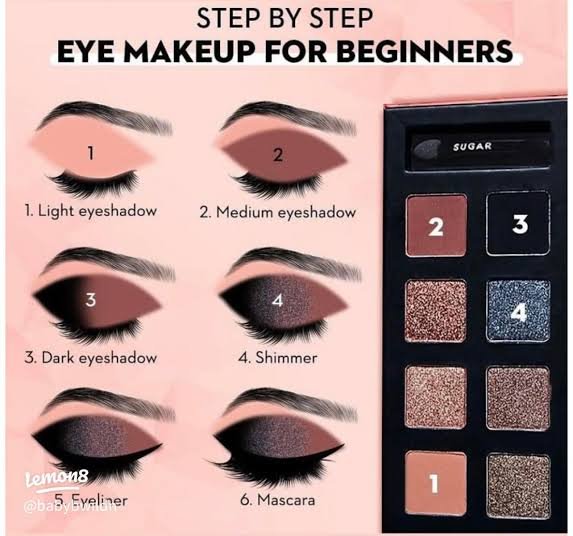
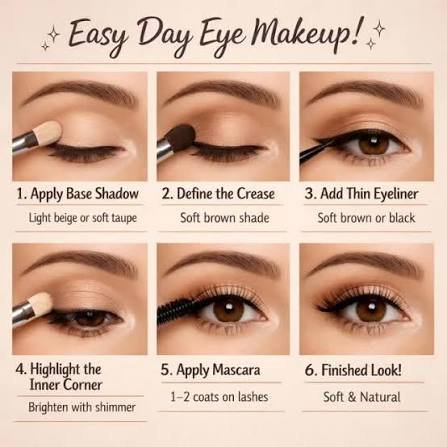
- Prep the lid. Apply primer and let it set for about thirty seconds so it isn’t tacky when shadow goes on top. Setting time matters more than people expect; shadow applied over wet primer tends to drag and streak.
- Apply the transition shade. Using the fluffy brush, sweep a matte shade close to your skin tone through the crease in a windshield-wiper motion. This creates a soft base of dimension before any bold color is added, and it’s the step most beginners skip, which is why so many first attempts at eyeshadow look flat.
- Deepen the outer corner. With the pencil brush, apply a slightly deeper matte shade to the outer third of the lid and crease, blending it upward and inward. This is what creates a lifted, “done” look even with minimal color, and it’s arguably the single highest-impact step in this entire tutorial.
- Pack on the lid shade. Using the flat shader brush, pat, don’t drag, your main shadow color onto the center of the lid. Patting preserves pigment intensity, especially with shimmer shadows, which lose vibrancy quickly if dragged across the skin.
- Blend the edges. Go back over the transition between shades with a clean fluffy brush to soften any harsh lines. There should be no visible line where one color stops and another starts. This step often takes longer than any other single step, and that’s normal; blending is where most of the “polish” in a finished look actually comes from.
- Add definition to the lower lash line. Using the pencil brush, sweep a small amount of the deeper shade along the lower lash line for balance. Skipping this step is one of the most common reasons an upper-lid look reads as unfinished.
- Line the eyes. Apply eyeliner as close to the lash line as possible, starting thin at the inner corner and gradually thickening toward the outer corner. Working in short, connected strokes rather than one long sweep gives you more control and an easier way to correct mistakes early.
- Curl and coat lashes. Curl lashes before applying mascara, then apply in a zig-zag motion from root to tip on both upper and lower lashes. Curling after mascara has already dried risks snapping lashes at the crimp point, so always curl first.
- Clean up fallout. Use a small amount of concealer on an angled brush to sharpen the under-eye area and correct any shadow fallout. This is also the moment to tidy any liner mistakes from step seven.
- Set and finish. A light mist of setting spray helps everything stay put for the day, particularly in humid climates or during long events.
Adapting Eye Makeup to Your Eye Shape
Not every technique flatters every eye shape the same way, and understanding your own eye shape is one of the fastest ways to skip years of trial and error.
Hooded Eyes
When the crease is partially or fully hidden by a fold of skin, blending shadow “with eyes open” is essential, since a closed-eye application often disappears once the eyes open. Focus color slightly above where the natural crease appears to sit when eyes are open, and keep winged liner slightly thinner to avoid it smudging onto the lid throughout the day. Matte shadows generally perform better than heavy shimmer on hooded lids, since shimmer can settle unevenly into the fold.
Monolid Eyes
Without a visible crease, gradient blending across the whole lid, from lighter at the inner corner to darker at the outer corner, creates dimension that a defined crease would otherwise provide. Winged liner and a soft smoky effect both tend to read beautifully on monolids because the flat lid surface shows color evenly, without the interruption a visible crease line can create.
Round Eyes
Extending shadow and liner slightly beyond the outer corner in a horizontal line helps elongate round eyes rather than emphasizing their roundness. Keeping the wing relatively flat, rather than sharply angled upward, tends to lengthen the eye shape more effectively.
Downturned Eyes
A wing that angles upward, rather than following the natural downward slope of the eye, helps lift the overall look. Concentrating slightly more shadow on the outer upper lid, rather than the outer lower lash line, also helps counterbalance the natural downward pull.
Deep-Set Eyes
Lighter, shimmery shadows on the lid help bring the eye forward, while very dark, matte crease colors can make deep-set eyes look even more recessed. A light shade on the brow bone and inner corner does a lot of work here to open the eye visually.
Close-Set Eyes
Concentrating darker color on the outer corners while keeping the inner corners light creates the visual effect of eyes set slightly farther apart. Extending liner slightly past the outer corner reinforces the same effect.
Almond Eyes
Almond eyes are often described as the most “universally flattering” base shape for techniques, since nearly every style, from a soft cut crease to a heavy smoky eye, tends to sit well on this shape without much adjustment. If this is your eye shape, most standard tutorials will translate directly without modification.
Category-Specific Looks
Natural, Everyday Makeup
Stick to two shades: a matte transition and a slightly shimmery lid shade in a similar tone family, soft browns, taupes, or warm golds. Skip heavy liner in favor of a smudged pencil liner and one to two coats of mascara. The goal here is enhancement, not transformation; you want to look like a well-rested version of yourself.
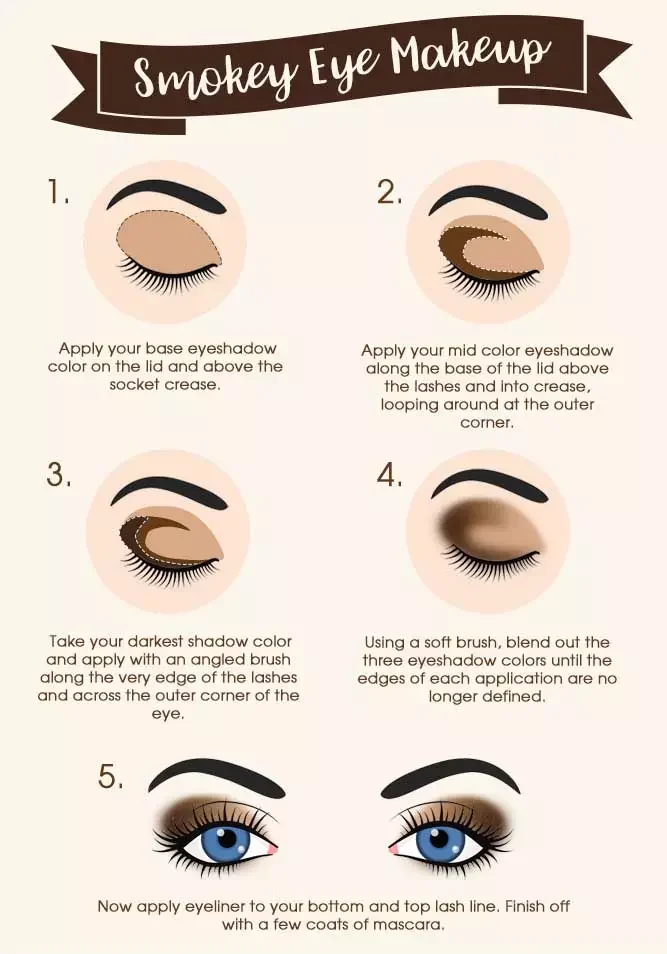
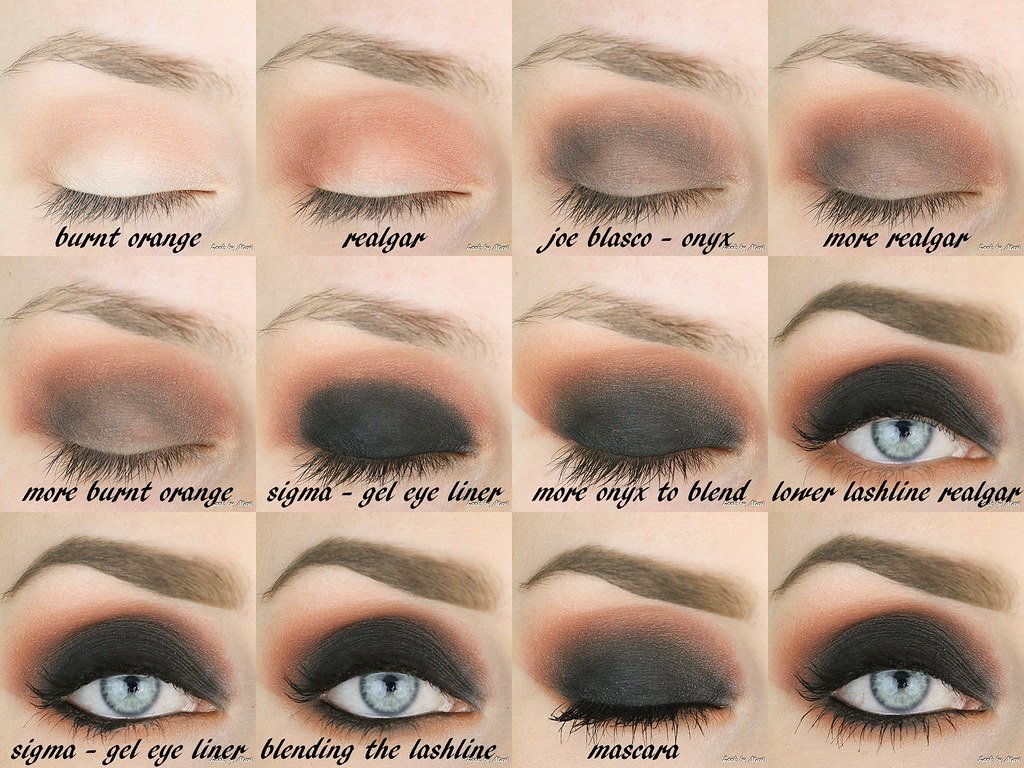
Smoky Eye
Build in thin layers rather than one heavy application. A common mistake is applying too much dark shadow too fast, which is much harder to soften than it is to build up gradually. Blend in small, circular motions with a clean brush between each layer, checking your progress with eyes open every few passes to see how the depth is developing in real light.
Cut Crease
This technique relies on contrast: a light, often matte or shimmer shade on the lid meets a sharp line of concealer or skin-tone shadow at the crease, with a deeper shade above that line. It’s dramatic, precise, and best attempted after you’re comfortable with basic blending, since the entire effect depends on a clean, confident line rather than a soft gradient.
Glitter or Festival Looks
Use a dedicated glitter primer or glue rather than pressing loose glitter into regular cream primer, which won’t hold sparkle as securely through a full day or night. Applying glitter with a flat, damp brush, pressing rather than sweeping, also gives more even, secure coverage than a dry brush.
Bridal or Special-Occasion Makeup
For events that need to photograph well and last for hours, favor long-wear formulas and slightly more product than you’d normally use, since flash photography tends to wash out subtle color. Waterproof mascara and a setting spray are worth the extra step for anything involving tears, whether happy or otherwise.
Common Eye Makeup Mistakes
Skipping primer. Shadow that creases by noon is almost always a primer problem, not a shadow problem.
Matching liner and mascara but ignoring brows. Unkempt or unfilled brows can undercut even a perfectly executed eye look, since brows frame the entire eye area and are often the first thing people notice, even if only subconsciously.
Dragging instead of patting. Dragging a brush across shimmer shadow disturbs the pigment and reduces intensity. Patting preserves it.
Over-blending shimmer. Unlike matte shadow, shimmer doesn’t need heavy blending; too much brush movement can turn a bold metallic into a dull smudge.
Ignoring the lower lash line. Skipping the lower lash line entirely can make upper-lid makeup look unfinished or unbalanced, especially with darker looks.
One coat of mascara and calling it done. Two thin coats, applied a minute apart to avoid clumping, almost always look more finished than one thick coat applied all at once.
Using old mascara. Mascara has one of the shortest shelf lives of any makeup product, generally around three months, because the tube is repeatedly exposed to air and bacteria with every use. Old mascara dries out, clumps, and can increase the risk of eye irritation.
Applying eyeshadow in the wrong order. Doing eyeshadow after foundation but skipping the “fallout shield” step often means redoing under-eye concealer entirely, which wastes both product and time.
Not tailoring liner shape to eye shape. A wing that works beautifully on one eye shape can visually pull down or shorten another. Testing a shape lightly with a pencil before committing with liquid liner avoids a lot of redo work.
Pro Tips Worth Remembering
- Tap off excess product from your brush before applying, especially with shimmer and glitter shadows, to control fallout before it happens rather than cleaning it up after.
- Set your under-eye concealer with powder before doing eyeshadow, then dust away fallout afterward, rather than trying to clean it up over finished concealer.
- Warm cream and gel liners slightly between your fingers before application for a smoother glide.
- If your eyeshadow crease work looks patchy, you likely need a transition shade underneath, not more of your main color.
- Keep a cotton swab dipped in a small amount of makeup remover nearby for quick line corrections without redoing the whole eye.
- Check your eye makeup in natural light before leaving the house whenever possible; indoor lighting, especially warm bulbs, can make blending look more finished than it actually is.
- If you wear glasses, slightly deeper or more defined eye makeup tends to read better through lenses, which can otherwise mute softer looks.
Building Your Routine Around Your Day
Eye makeup doesn’t have to be one-size-fits-all across every day of the week. Thinking in terms of a few go-to routines, rather than reinventing your look every morning, saves time and actually produces more consistent results.
The Five-Minute Routine
For mornings when time is tight, a single shimmery shadow patted across the whole lid, a quick smudge of pencil liner along the upper lash line, and one coat of mascara covers the basics without requiring any blending expertise. This routine leans entirely on product quality rather than technique, so it’s worth spending slightly more on a shadow that applies smoothly with minimal effort and a mascara that builds definition in a single pass.
The Workday Routine
A slightly more built-out version of the foundational tutorial above, using two to three shades instead of one, works well for a full workday. Favor matte and satin finishes over heavy shimmer or glitter, since these tend to photograph and read more appropriately in professional settings, and they’re less likely to transfer onto glasses or a mask if you’re wearing one.
The Evening or Event Routine
This is where more advanced techniques, deeper color, precise liner, and false lashes if you wear them, come into play. Because evening lighting is often warmer and dimmer than daylight, colors can afford to be slightly more saturated than they’d look ideal in daylight; what reads as “just right” under office lighting can look washed out under restaurant or event lighting.
The Weekend Experimental Routine
Weekends, or any low-stakes day, are the ideal time to practice techniques you haven’t mastered yet, a cut crease, a bold color combination, graphic liner. Because there’s less time pressure and lower stakes if it doesn’t turn out perfectly, this is genuinely one of the fastest ways to build skill. Professional makeup artists often describe their own skill growth the same way: most of it happened during unpressured practice, not on the job.
Eye Makeup Longevity: What Actually Affects Wear Time
A few underlying factors determine how long any eye look lasts through the day, and understanding them helps you troubleshoot far more effectively than simply switching products at random.
Oil production. Naturally oilier eyelids break down eyeshadow and liner formulas faster, since oil interferes with how powder and pigment adhere to skin. If this describes your lids, primer isn’t optional, it’s the single highest-impact product you can add to your routine.
Climate and humidity. Warmer, more humid climates accelerate product breakdown and increase the likelihood of smudging, particularly with pencil liner and cream shadow. Setting spray and slightly more emphasis on powder-based products tend to perform better in humid conditions.
Eye rubbing and touching. This sounds obvious, but repeated touching throughout the day, adjusting glasses, rubbing tired eyes, is one of the most common reasons liner and mascara smudge, independent of formula quality.
Application thickness. Thin, layered application almost always outlasts one thick application, both because it adheres better to the skin and because it has less product to physically shift or crease.
A Short Note on Eye Safety
A few basic safety habits are worth building into any eye makeup routine, regardless of skill level.
Always remove eye makeup fully before sleeping. Leaving mascara and liner on overnight increases the likelihood of clogged lash follicles and irritation, and it can contribute to lashes becoming brittle over time.
Replace mascara on schedule rather than by how full the tube looks, since the risk isn’t running out of product, it’s bacterial buildup inside the tube itself.
Avoid sharing eye makeup, particularly mascara and eyeliner that make direct contact with the lash line or waterline, since this is one of the more common ways eye infections spread.
If a product causes stinging, redness, or persistent irritation, discontinue use. This is especially worth watching for with glitter and loose pigment products, which can occasionally cause irritation if particles get into the eye itself, another reason a dedicated glitter formula, rather than loose craft glitter, matters more than it might seem.
maybelline sky high mascara review
Frequently Asked Questions
Do I really need eyeshadow primer? It’s not mandatory, but it significantly improves how long shadow lasts and how true the color stays throughout the day, particularly if you have oily eyelids or live somewhere humid.
What’s the difference between a pencil, gel, and liquid liner? Pencil liners are softest and easiest to blend, making them best for smoky or smudged looks. Gel liners, applied with an angled brush, offer more precision with some blendability. Liquid liners create the sharpest, most graphic lines but are the least forgiving for mistakes.
How often should I replace my eye makeup? Mascara should be replaced roughly every three months. Liquid and gel liners generally last three to six months. Powder eyeshadows can often last up to two years if kept clean and dry.
Can I use the same brushes for cream and powder products? It’s best to use separate brushes or clean them thoroughly between uses, since cream product left on a brush can affect how powder shadow applies afterward, making it patchy or streaky.
Why does my eyeshadow crease or fade by the afternoon? This is almost always caused by skipping primer, using too much cream product without setting it, or having naturally oily eyelids. A primer paired with a light powder setting step usually solves it.
What eye shape is winged liner best for? Winged liner flatters nearly every eye shape when the angle is adjusted correctly, upward for downturned eyes, close to the natural lash line for hooded eyes, and slightly extended for round eyes.
How do I stop my mascara from flaking throughout the day? Flaking is often a sign the formula has started to dry out, so replacing mascara on schedule helps. Applying too many heavy coats at once, rather than a couple of thin coats, is another common cause.
Conclusion
Great eye makeup isn’t about owning the most products or mastering the most complicated technique first. It’s about understanding a few core principles: transition shades create dimension, patting preserves pigment, primer extends wear, and shape-specific adjustments make techniques actually work for your eyes rather than against them. Start with the foundational everyday look in this guide, get comfortable with blending, and layer in more advanced techniques like cut creases or smoky eyes once the basics feel automatic. The eyes you have are the ones worth learning to work with, and with a little practice, every look in this guide is achievable at your own vanity, no professional artist required.

I’m an SEO content writer and product researcher with experience creating well-researched product reviews, comparisons, buying guides, affiliate articles, and helpful website content. At LoookNow, I focus on researching products, comparing features and value, and creating clear, engaging, search-optimized content to help readers make more informed purchasing decisions. My goal is to provide useful, trustworthy, and easy-to-understand information that saves readers time and reduces confusion when choosing products online.